

The_Techie
Resident Techie
Most enthusiasts are well-versed in the "art" of overclocking a CPU, that is, running a CPU above its rated clock speed. Large overclocks usually require you to increase the core voltage (VCore) of the CPU to run at the higher clock speed without any stability issues. This act of raising the VCore (known as overvolting the CPU) causes extra power consumption by the CPU and higher heat output. In order to keep the temperatures of the CPU cores at acceptable levels, aftermarket cooling is often required for large overclocks, whilst so-called "stock" cooling may suffice for smaller overclocks.
Today, I will be discussing the opposite, undervolting your CPU whilst maintaining the clock speed. This is a completely free remedy for two common problems:
a) High CPU temperatures, even at stock clock speed.
b) High power consumption, even at stock clock speed.
First, a primer on how a CPU's voltage is decided, as well as elaboration on certain important concepts which you must grasp before undervolting your CPU:
How a CPUs voltage is decided
Not all CPUs are created equally. Due to flaws in the manufacturing process and quality variances of materials used during the manufacturing process, two different CPUs that are designed to run at a given clock speed can have different voltage requirements to maintain stability and accuracy at that speed. When these CPUs are manufactured, the manufacturer decides on an upper bound of voltage required to start execution on all of the CPUs in the batch (this upper bound is referred to as the VID of the CPU) and an upper bound of voltage required to keep all of the CPUs in the batch operating and accurate (this upper bound is referred to as the VCore of the CPU). This varies between batches of CPUs manufactured, as you may see a CPU with a default voltage of, say, 1V from one batch and the same model CPU with a default voltage of, say, 1.05V from a different batch.
However, as this is typically a worst-case scenario, a lot of the CPUs are able to operate at lower voltages than the VCore assigned to the range of CPUs. Finding this minimum required voltage is what this guide is all about.
Why would I want to undervolt my CPU?
a) To lower the temperature of your CPU
b) To lower the power usage of your CPU
c) To increase the expected lifetime of your CPU
Some important definitions and concepts
Here are some definitions which you must know:
VID - The amount of voltage required to initiate operation of a CPU at startup
VCore - The amount of voltage used by the CPU during operation
VDrop - The difference between the voltage specified by the BIOS and the voltage used by the CPU in an idle state
VDroop - The difference between the voltage used by the CPU in an idle state and the voltage used by the CPU under load
Most motherboards attempt to minimize or even eliminate VDroop by implementing Load Line Calibration. If your motherboard supports it, you might want to experiment with this to see whether it's worth your while to enable it.
The lower the voltage used by the CPU, the lower the heat output and power usage thereof. The opposite is true as well.
How do I find the minimum voltage required for stability by my CPU?
This, unfortunately, is an act of trial and error. You have two options:
a) Lower the voltage of your CPU in the BIOS by one step (the lowest possible amount that your motherboard allows you to change, normally done by either the PGUP and PGDOWN keys or the + and - keys, to increase or decrease a value by a step) and then test the stability using a stability tester like Prime95 for a few hours. If your system is stable, repeat until you find instability and use the value that you used just before experiencing instability.
b) Greatly lower the voltage of your CPU and then test the stability using a stability tester like Prime95 for a few hours. If your system is unstable, increase the voltage by one step and test again. Repeat until you have found the lowest stable voltage.
A real-world example
I have a system with the following specifications:
Intel Core2Quad Q6600 (G0 revision) at 2.4GHz with stock Intel cooling and SpeedStep turned on
Gigabyte GA-G31M-ES2C
2 x 1GB Corsair XMS2 DDR2-800 CL5
NVIDIA GeForce 8800GT 512MB
2 x Seagate 320GB SATAII
Corsair 400W
The tests were performed at an ambient temperature of 20C in a closed ATX case with one 80mm mounted as an extraction fan at the back.
This CPU has a default voltage of 1.25V which, after VDrop and VDroop reflects the following voltages:
Idle voltage: 1.136V
Load voltage: 1.184V

The idle temperatures are as low as 39C whilst the temperatures under 100% load peaked at 71C.
Now, by following the steps above, I have lowered the voltage to 1.05V which, after VDrop and VDroop reflects the following voltages:
Idle voltage: 1.008V
Load voltage: 0.992V

The idle temperatures are as low as 26C whilst the temperatures under 100% peaked at 52C.
Even under 100% load for more than 3 hours the temperatures never exceeded 59C (the ambient temperature was 23C during this test):
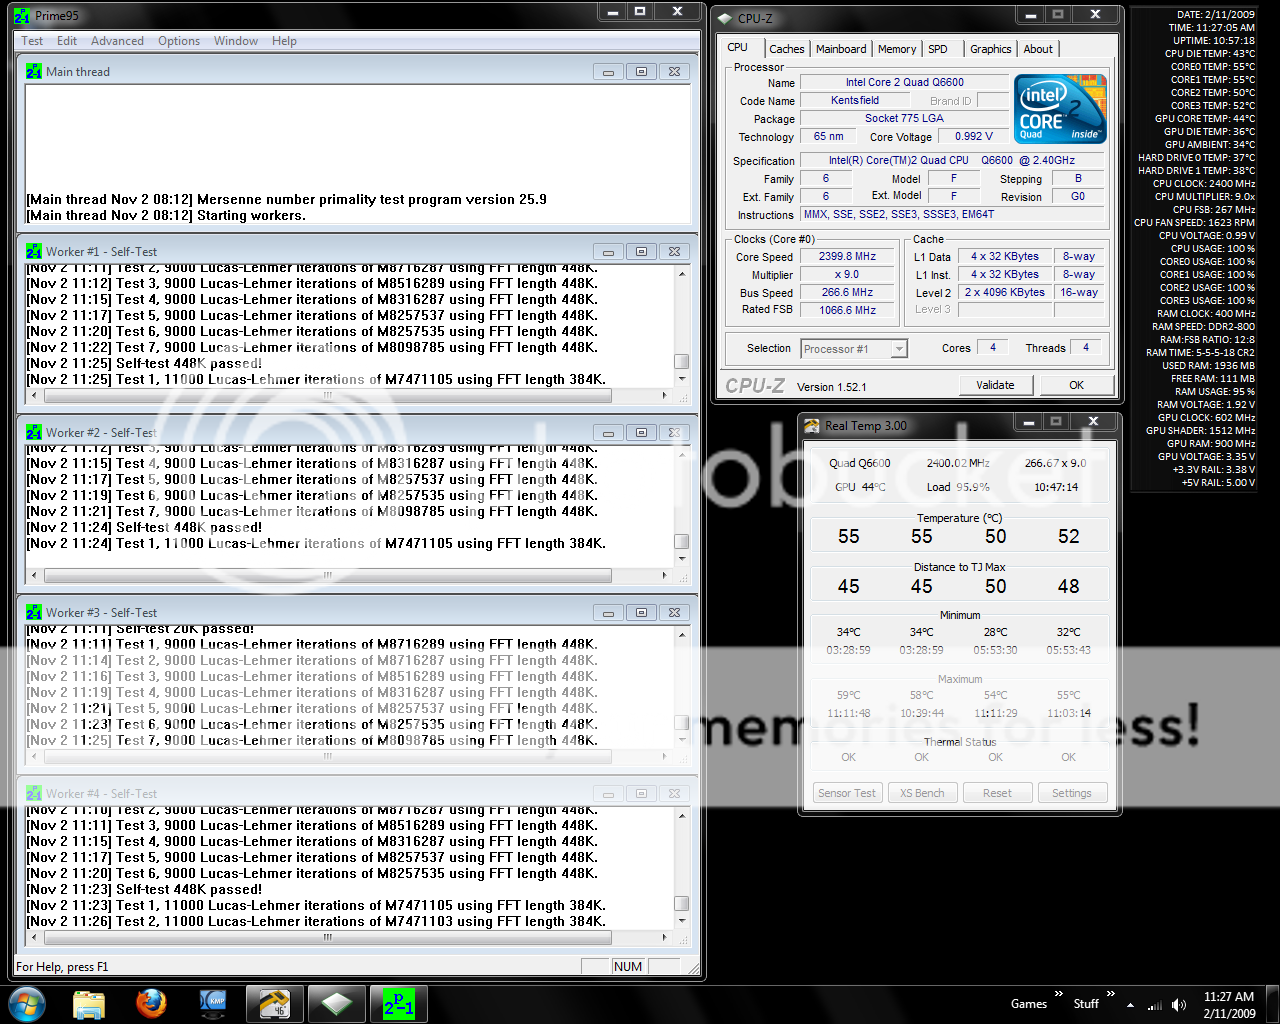
As you can see, the system still operates at 2.4GHz so you will experience no performance hit by undervolting your CPU as long as you maintain stability.
Today, I will be discussing the opposite, undervolting your CPU whilst maintaining the clock speed. This is a completely free remedy for two common problems:
a) High CPU temperatures, even at stock clock speed.
b) High power consumption, even at stock clock speed.
First, a primer on how a CPU's voltage is decided, as well as elaboration on certain important concepts which you must grasp before undervolting your CPU:
How a CPUs voltage is decided
Not all CPUs are created equally. Due to flaws in the manufacturing process and quality variances of materials used during the manufacturing process, two different CPUs that are designed to run at a given clock speed can have different voltage requirements to maintain stability and accuracy at that speed. When these CPUs are manufactured, the manufacturer decides on an upper bound of voltage required to start execution on all of the CPUs in the batch (this upper bound is referred to as the VID of the CPU) and an upper bound of voltage required to keep all of the CPUs in the batch operating and accurate (this upper bound is referred to as the VCore of the CPU). This varies between batches of CPUs manufactured, as you may see a CPU with a default voltage of, say, 1V from one batch and the same model CPU with a default voltage of, say, 1.05V from a different batch.
However, as this is typically a worst-case scenario, a lot of the CPUs are able to operate at lower voltages than the VCore assigned to the range of CPUs. Finding this minimum required voltage is what this guide is all about.
Why would I want to undervolt my CPU?
a) To lower the temperature of your CPU
b) To lower the power usage of your CPU
c) To increase the expected lifetime of your CPU
Some important definitions and concepts
Here are some definitions which you must know:
VID - The amount of voltage required to initiate operation of a CPU at startup
VCore - The amount of voltage used by the CPU during operation
VDrop - The difference between the voltage specified by the BIOS and the voltage used by the CPU in an idle state
VDroop - The difference between the voltage used by the CPU in an idle state and the voltage used by the CPU under load
Most motherboards attempt to minimize or even eliminate VDroop by implementing Load Line Calibration. If your motherboard supports it, you might want to experiment with this to see whether it's worth your while to enable it.
The lower the voltage used by the CPU, the lower the heat output and power usage thereof. The opposite is true as well.
How do I find the minimum voltage required for stability by my CPU?
This, unfortunately, is an act of trial and error. You have two options:
a) Lower the voltage of your CPU in the BIOS by one step (the lowest possible amount that your motherboard allows you to change, normally done by either the PGUP and PGDOWN keys or the + and - keys, to increase or decrease a value by a step) and then test the stability using a stability tester like Prime95 for a few hours. If your system is stable, repeat until you find instability and use the value that you used just before experiencing instability.
b) Greatly lower the voltage of your CPU and then test the stability using a stability tester like Prime95 for a few hours. If your system is unstable, increase the voltage by one step and test again. Repeat until you have found the lowest stable voltage.
A real-world example
I have a system with the following specifications:
Intel Core2Quad Q6600 (G0 revision) at 2.4GHz with stock Intel cooling and SpeedStep turned on
Gigabyte GA-G31M-ES2C
2 x 1GB Corsair XMS2 DDR2-800 CL5
NVIDIA GeForce 8800GT 512MB
2 x Seagate 320GB SATAII
Corsair 400W
The tests were performed at an ambient temperature of 20C in a closed ATX case with one 80mm mounted as an extraction fan at the back.
This CPU has a default voltage of 1.25V which, after VDrop and VDroop reflects the following voltages:
Idle voltage: 1.136V
Load voltage: 1.184V
The idle temperatures are as low as 39C whilst the temperatures under 100% load peaked at 71C.
Now, by following the steps above, I have lowered the voltage to 1.05V which, after VDrop and VDroop reflects the following voltages:
Idle voltage: 1.008V
Load voltage: 0.992V
The idle temperatures are as low as 26C whilst the temperatures under 100% peaked at 52C.
Even under 100% load for more than 3 hours the temperatures never exceeded 59C (the ambient temperature was 23C during this test):
As you can see, the system still operates at 2.4GHz so you will experience no performance hit by undervolting your CPU as long as you maintain stability.
 You are not going to be saving a lot of money by doing it would you?
")
")
